

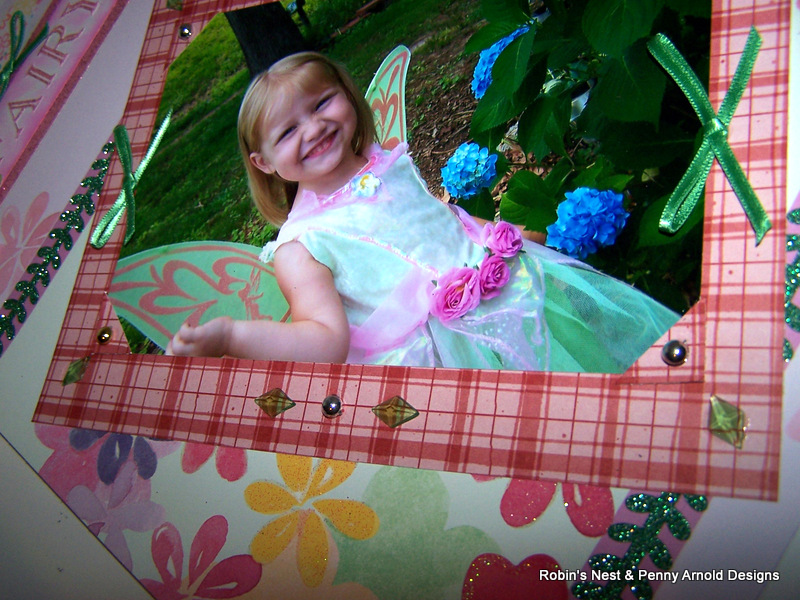
I am new to their DT this year, and was thrilled to be accepted into this great team. This layout features my granddaughter Madison in her favorite "Fairy" costume. We had a blast taking photo's of her that day, and we were even lucky enough that the flower's were blooming as well.
Spring-Flowers-Glitter-Cardstock
You can't really see it in this photo, but most of the flowers on this page are covered in lovely glitter.

Red-Plaid-Cardstock
I love this great plaid, it would work for camping, Christmas, Valentines, Easter, and lot's of other fun themes as well as this garden theme.

Rosy-Cards
I loved this quote, and it's even double sided, and has a "Fairy" quote on the opposite side, but sadly it didn't match my color palette as well as this side did, even though the opposite side matched my layout's "Fairy" theme.

Alpha-Glitter-Stickers- in pink
These are so much prettier in real life as well. Lot's of nice glitter, perfect for any girly girl page, and they lined up nicely..

Dew-Drops Originals
Diamond-Dew-Drops
Love these little beauties, I can see lot's of fun thing's to do with these. Flower centers, water droplet's, jewel accents, etc., anywhere you want a little added attention, yet small enough to not cause lumps, and bumps on your other album pages.

Glitter-Word-Titles
I liked this card because it could be used all in one piece, or my favorite technique cutting it apart so you can make your supplies last, and last..

I used this glitter cardstock to accent the title strips, and also used it to make a crown punch out shape. It really sparkles and shines.

Here is where I cut this glitter cardstock in order to make a backing for the title strips. The word "Fairy" on here was done with the alphabet stickers. I used a piece of the plaid cardstock, for the "Fairy" title, but I used the reverse side,(white) and inked it pink before adding the letters. I was trying to make it match the "word quote" strip color. I think it came out pretty well.

I also used ScraPerfect's Best Glue Ever on this layout. I love this glue, it works on ANY kind of materials. Metal, plastic, wood, fabric, cardstock, you name it, and it will glue it, and it uses very little glue compared to other adhesives I have tried..


Here are the titles glued together. Perfect! I used a little of the distress ink on the original title as well just so they matched a bit better.

Here is what they looked like after I added bows, and some of the gold dew drops. I also added some pre-made flowers to some places on the layout. To the right you will see the crown punch out shape made from the glitter cardstock. To the top of this page, and on the pink solid color strips I added two different kind's of washi tapes. I used the green washi tape just to add some green so that the layout would better match my photo colors.

For the tag I used more of the plaid paper, and cut it into a rectangle shape. Next I used the grid pattern to cut the corners of the tag down. No measuring required. The ribbons at the top of the tag came from a little girl's hair bow. (I'm frugal like that) Then I added the word quote, more of the green washi tape, and just a bit of lace.


Here is a photo of the tag glued in place on the layout.

I made the photo frame out of the same plaid cardstock, and again adding more dew drops, this time in regular, and diamond shapes. I also added photo corner holders, and bows. The grid pattern helped to line everything up perfectly. Super easy!
So that's my layout for today, I hope I have inspired you to create something fun with these wonderful products. Be sure to check in tomorrow for more DT member projects. Till next time Happy Scrapping. Love Penny

So bright & cheerful!
ReplyDeleteVery pretty.
ReplyDeleteCute cute layout! I love it!! Great job!
ReplyDeletesuper page.. great combo of colours, design and accents
ReplyDeleteWhat a sweet page! Love it!
ReplyDeleteGorgeous page! Awesome techniques!
ReplyDeleteLove the trim and dew drops!
ReplyDeleteGood job!!
ReplyDeleteLove this cute layout!!!
ReplyDelete