
I can help you with that!
It's Ro again with a fun little project to start your New Year out on schedule! Thanks to The Robin's Nest for inviting me back for a second term!The Robin's Nest this month is featuring the Wild About You collection on their store site. You can save 20%!!! And, wow, is it cool!
For my first project of the year, I decided to stray a little from the card scene. The size is similar, but the result is huge!

And I made not one, but three! These little calendars were SO MUCH FUN to make. Thanks to Gina's Designs, who are cross-promoting with us this month, I had some amazing embellishments to jazz up these calendars. See the bottom of this post for a full list of supplies used.
All three calendars where basically constructed the same way, so I'll just show you the basics for one of them so I don't bore you. We want to keep you energized, not put you to sleep! lol

I downloaded a free 2014 calendar from the internet and cut it down to size. Since there was not much of a margin around each page of the calendar, I decided to mount them on slightly larger pieces of paper so I would have room to attach them to the base.
I used my Silhouette Cameo to cut the easel backs out of plain cardstock.

I used a heavier piece of chipboard for the base and attached my Robin's Nest cardstock to that, with the easel attached to the reverse side. Hint: Use sturdy tape so things don't fall off since this will be used all year long. I use the kind you tear to size and then peel off the paper.
For each calendar, I painted the Gina's Designs chipboard embellishments and used different mediums to jazz them up.

For the birdcage, I used glitter:

After all my pieces were done, I simply attached everything to the base. Each calendar was then attached with a decorative staple and some heavy-duty adhesive.
The following photos show each individual calendar and closeups of the papers used and embellishments.

I selected the Valentine Stripe paper, and used washi tape as the background for the year and the birdcage. For the year, I used TRN glitter letters/numbers. I added some Dew Drops and a dragonfly to finish it off.

The dragonfly was heat embossed with some Zing Embossing Powder in pink glitter. Love the sparkle.

For the next calendar, I changed it up a bit. I used the wild Black and White Animal Print for the base.

I surprised myself by falling madly in love with this little chair! And the chair needed a lamp! But since I didn't have one, I simply cut the top off a dress form and...voila!...instant lamp! I painted both pieces and let them dry. I then added some silver embossing powder to the base of the "lamp" and some silver Dew Drops as an accent for the lampshade.
This chair is done with FLOCKING!!! How stinkin' cute is that?! It's fuzzy! I simply put glue on the piece where I wanted the "cushion" and sprinkled the flocking on. Tap it into the glue and let it dry.

For the final calendar, I knew I had to play with this awesome peacock feather!
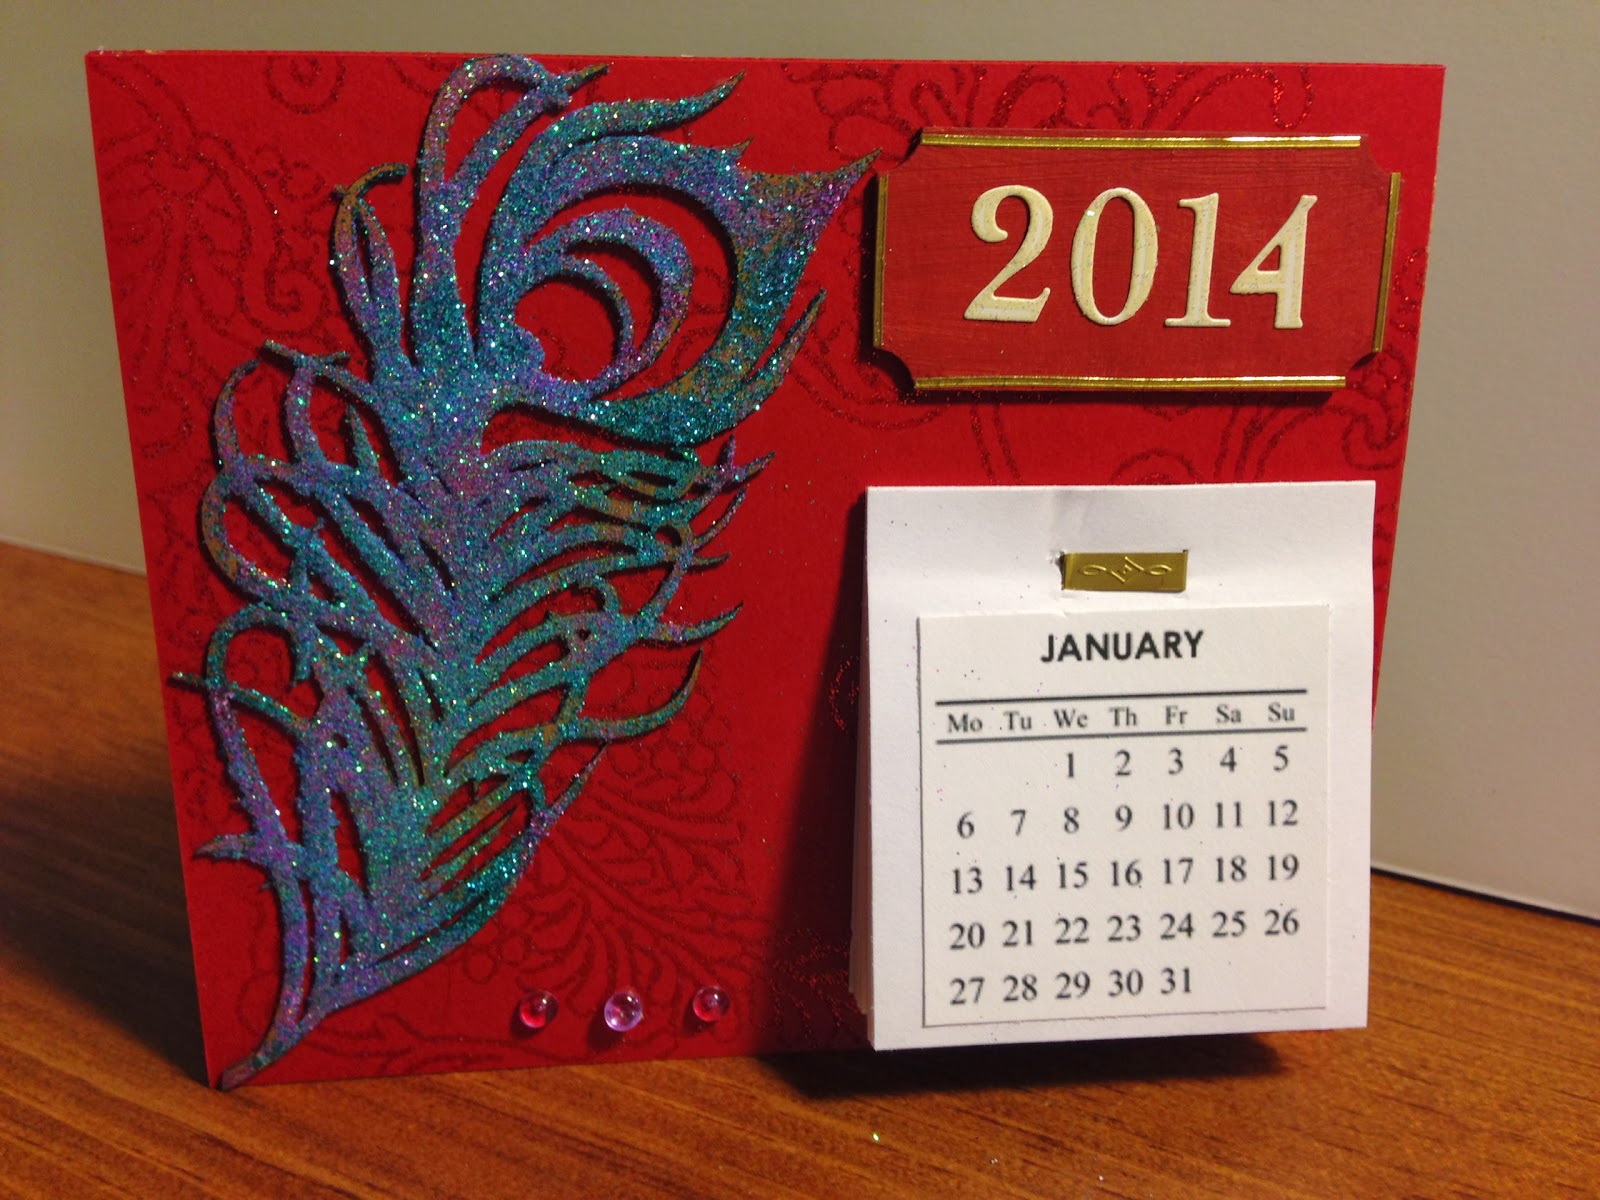
Since the colors are so brilliant, I didn't add a lot of embellishments. I let the paper and the feather do all the talking. The paper is called Red Glitter Paisley. I used glittered letters/numbers again for the year and mounted them on a painted piece from Gina's Designs. I edged that with gold stickers. With a few Dew Drops at the bottom, this was a finished piece.
For the feather, I slathered it with glue and used several colors of fine glitter to "paint" the design.

You can see how these great papers and embellishments complement each other! I hope I have inspired you to give them a try! Remember....20% off the Wild About You collection for the month of January!
For more information about Ro, visit Toodle Noodle Creative!
Supplies Used From The Robin's Nest and Gina's Designs:
 |  |  |  |  |
 |  |  |  |  |
InLinkz.com
Other: Basic cardstock, chipboard, adhesive, Silhouette Cameo, Easel Back cutting file (#282013), Acrylic Paint, Washi Tape, EK Success decorative staples and stapler, Zing Embossing Powder (Pink Glitter), Stampendous Fun Flock (black), Stampin' Up Embossing Powder (Sterling Silver), Recollections Glitter
Other: Basic cardstock, chipboard, adhesive, Silhouette Cameo, Easel Back cutting file (#282013), Acrylic Paint, Washi Tape, EK Success decorative staples and stapler, Zing Embossing Powder (Pink Glitter), Stampendous Fun Flock (black), Stampin' Up Embossing Powder (Sterling Silver), Recollections Glitter
These are Soooooo Cute! Love the glitter!
ReplyDeleteSimple adorable!!! Love them all!!!
ReplyDeleteGreat job!! I am going to have to make one!! :)
ReplyDeleteVery nice, great collage of ideas
ReplyDeleteJust fabulous. These would look awesome on my desk. Hint hint. LOL
ReplyDeleteLovely works..and very useful for everyone:-)
ReplyDeleteThey are all GORGEOUS!
ReplyDeleteHave a wonderful day,
Migdalia
Crafting With Creative M
wow...love that feather...such a neat little calendar idea!!
ReplyDelete